Remodeling a room can get expensive really quick. From purchasing new materials to paying for labor, the average kitchen remodel costs $21,751. Removing your old countertop yourself can be a great way to cut project costs. While tearing out countertops isn’t complicated, it does require physical strength – and a little help from your friends.
Read on for expert countertop removal tips from Mr. Handyman.
Laminate countertops are especially easy to remove yourself, since they are typically the lightest material. However, if you’re removing granite, quartz or another heavy stone, you should probably call an expert. “If this is your first DIY project, you may want to stop while you’re ahead and hire a professional,” said J.B. Sassano, President of Mr. Handyman. “Your perceived savings will disappear if you damage your cabinets, the plumbing or the sink while trying to remove them.”
“Removing a sink and sections of countertop can require significant upper arm strength – if you know how to do the task, but do not feel you will be able to lift, twist and bend heavy items, prevent sore muscles or injury by requesting assistance!”
J.B. Sassano | President, Mr. Handyman
Ready to take on DIY countertop removal? Let’s gear up.
Tools for Countertop Removal:
Before you start, it’s important to remove all countertop appliances and accessories from your work area. Then remove the drawers and items stored in your lower shelving to prevent dust contamination and give you easy access to the countertop. You should also clear the area of food, cookware and utensils for safety.
To safely remove your kitchen countertop:
After disconnecting the drain lines, you’ll need to remove your drop-in fixture or undermount-style sink.
Pro-Tip: Sinks can be heavier than you think! For example, a cast iron model can weigh over 100 pounds. Have an assistant on hand to help you lift out the fixture, especially for double-bowl configurations.
Now, the main event – taking off the countertop.
When your countertop was installed, it was sealed along the edges with caulk. Over the years, more caulk may have been applied to prevent water damage. For easier countertop removal:
Check underneath your cabinets to see if your kitchen countertop is held in place with screws. If so, use a screwdriver to unfasten them. After that, you should be able to easily lift the countertop without damaging your cabinets.
Countertops can also be held in place with brackets, nails or additional adhesive. If this is the case, use a pry bar to gently lift the countertops from under the rim, working your way from one end of the counter to the other. Be patient and – to keep you and your cabinets safe – do not use excessive force on the pry bar.
“There will likely be several nails sticking out from the bottom of the countertop once removed. Use a hammer and bend them to prevent someone from accidentally stepping on a sharp nail.”J.B. Sassano | President, Mr. Handyman
To safely remove a large or heavy countertop, you may need to use a reciprocating saw to cut it into manageable pieces. “Stay safe by wearing safety goggles and a dust mask when cutting countertop sections,” said Sassano.
Once the countertops are free from the cabinets and wall, it’s time to lift. Be safe! This step is much easier with at least two people. Make sure to rent a renovation dumpster to easily dispose of your countertops and other remodeling debris since they won’t be accepted at the curb.
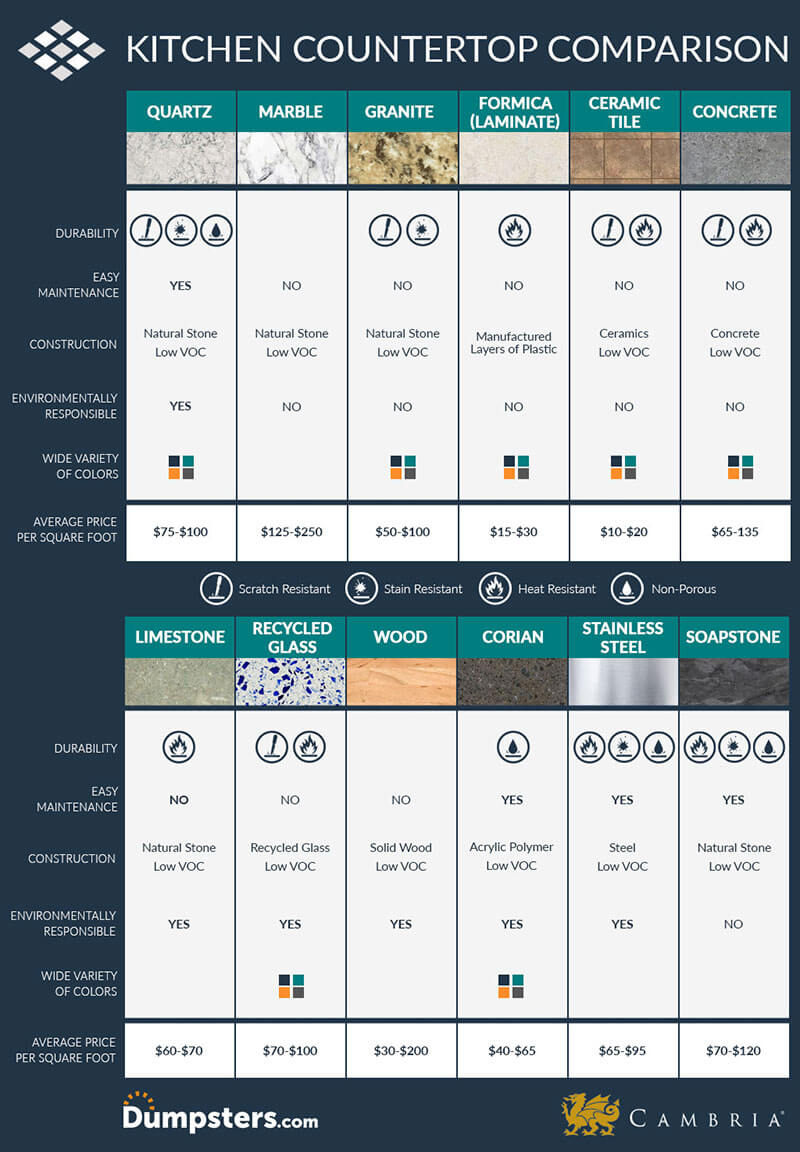
Now that your old countertops are gone, it’s time to choose a replacement. With so many options available, it’s difficult to decide which type of countertop is right for you. Use our infographic below to learn the pros and cons of each material.
“If your new countertop is an expensive material such as granite, marble, etc. – avoid the heartache of it becoming damaged by inexperienced installation.”
J.B. Sassano | President, Mr. Handyman
Once you’ve tossed the old ones in your dumpster, sweep away any dirt or debris from the area to prepare for new countertop installation. Before you know it, you’ll be showing off your beautiful new kitchen at your next dinner party!
Are you removing tile too? Looking for popular kitchen trends? Browse the For the Home section of our blog for DIY projects, home organization advice and more!

